Model and Texture a Pistol for Games or Film
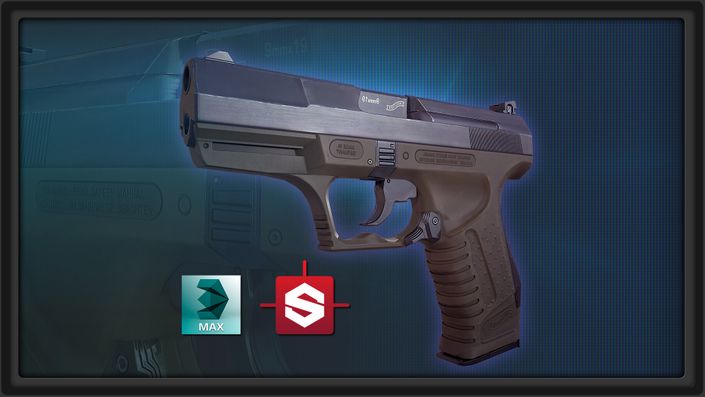
Model, Texture, and Render a Walther P99 using 3ds Max, Substance Designer, and Marmoset Toolbag 3.
Watch Promo
In this tutorial we will go over on how to create the high and low poly of a Walther P99. We will first go over our reference where we will talk about the best way to approach a complicated model such as this one. Next, we will then move onto creating the body for our high poly model using clean geometry and a non destructive workflow. After that we will do a timelapse, finishing all small details on the body. Then once that is done we will move into the top part of the weapon where we will use a combination of plane modeling and line modeling to get a good and accurate result. Once again, we will finish off with an timelapse of the remaining parts. During all timelapses there will still be a narration explaining the thought process behind all the choices I make. Then finally when everything is done, we will use the non destructive workflow to turn our high poly back into a low poly and optimize it until it is a game ready model.
In the second half of the tutorial we will continue where we left off with the modeling course. Now that we have our high poly and our low poly - in this tutorial we will go over on how to properly unwrap our weapon and utilize the most space so that we have the highest resolution possible. After that we will set-up our scene ready for making in marmoset and export all our models. Then we will move to Marmoset Toolbag 3 and start by baking all our texture maps and fix any baking bugs. After that we will move into substance painter where we will set-up our scene and start adding more normal map details like screws, text etc. Once that is done and it is looking good we will create the base colors of our prop and go over on how to archive good material definition. Then we will first start working on the top of our asset, setting up color changes, edge scratches and overall dirtiness. When everything is looking good we will move the the base of our weapon which is made of an different material so we will also need to add different details to that. We will be mostly adding things like edge highlights, dirt, roughness changes and more. Finally when we are happy with our texture we will set-up a nice scene in Marmoset Toolbag 3 and present the weapon at portfolio quality.
Your Instructor

Emiel Sleegers is a 21 years old originally from The Netherlands. He is currently located in the UK. He is a 3D environment artist working in the game industry. He's worked for companies like Playground Games and Ubisoft with so far one announced title on his name named: Forza Horizon 3, with another title on the way. He's a self taught artist who one day 4 years ago wanted to know how the amazing games he always played were made. The rest is history.
Course Curriculum
-
Preview1356 -01-Introduction (1:28)
-
StartDownload Course Source Files Here!
-
Start1356 -02-Reference Overview and Scene Setup (9:58)
-
Start1356 -03-Start Modeling the High Poly Base (19:28)
-
Start1356 -04-Continuing the High Poly Base (19:58)
-
Preview1356 -05-Modeling the Top High Poly Base (19:07)
-
Start1356 -06-Finish Modeling the High Poly Base (15:06)
-
Start1356-07-Additional Base Modeling Timelapse (16:23)
-
Preview1357-01-Introduction (0:50)
-
Start1357-02-Modeling the Top of the High Poly (14:42)
-
Start1357-03-Finish the Top of the High Poly (14:25)
-
Start1357-04-Making SomeMinor Changes (16:17)
-
Start1357-05-Modeling the Front of the High Poly (17:09)
-
Start1357-06-Modeling the Back of the High Poly (19:06)
-
Start1357-07-Additional High Poly Timelapse (10:15)
-
Preview1358-01-Introduction (0:52)
-
Start1358-02-Converting the Base to the High Poly (19:50)
-
Start1358-03-Finish Converting the Base into High Poly (13:50)
-
Start1358-04-Timelapse for the Final Pieces (9:08)
-
Start1358-05-Converting the High Poly into Low Poly (9:36)
-
Start1358-06-Finish Converting the Low Poly (9:40)
